

Workarounds aren’t really a good idea. We worked around a number of mainsail problems for years. We’re finally past those not-to-smart compromises.
I don’t really have good pictures of the new sails. They went on late last year, and then came down for the winter, unused.
Here they are in the saloon. Waiting.
These include gorgeous — red — sail covers.
CA made the previous covers from the Sailrite “Stackpack” design. Sailrite has kits, of course, but they have a lot of information on building your own. https://sailrite.wordpress.com/tag/diy-stack-pack/ for some guidance.
The sailmaker came to take measurements of our main and mizzen last year, and commented that our main had a lot of slides. A real lot. This made the stack by the mast taller than it needed to be. They would not be using as many slides, and the stack would be shorter.
This explains why our original sail cover was so HUGE. CA never liked it, and we reworked it over the years, hemming it and putting in darts. All the usual tailoring things to get it to fit the sail better.

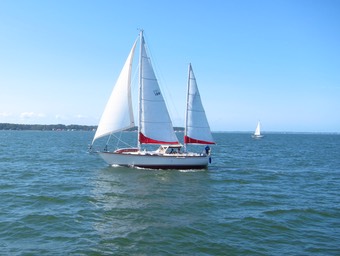
Here’s a picture of the new sails and their new covers. You can see the cover wraps tightly around the mast.
This would not have worked out so nicely because there was a mast step on the port side, right in the way. The previous owner had put them up the main. (We love them. But. There are issues.)
We had worked around the mast step by adjusting the stack pack. CA cut and hemmed a notch around the step. We worked out a way to lash the cover around and over the step.
The sailmaker said that a better idea was to remove it. Don’t work around it. Replace it with something smarter. Replace it with a folding aluminum step. See https://www.defender.com/product.jsp?id=1280218 for the Sea Dog step. The sail cover can lash down around and over this without any work-arounds.
Oh. Lesson learned: Don’t work around it; Fix it.
Fixing it, however, wasn’t easy. The steps have stainless screws.
I’ll repeat that for folks skimming.
The steps have stainless screws.
Each screw was oxidized into position more-or-less permanently. Using a wrench and a Phillips drive bit, I got one screw out. I spent days with penetrating oil. I used Vice Grips to mush the heads and twist until one head broke off. Leaving me no choice. Each screw had to be patiently drilled out. A 3/16″ TiN bit at slow speeds will (eventually) pop the head off the screw.
(Two batteries for the 20V DeWalt also helped: charge one while working the other.)

Finally.
This weekend it was warm enough to finish the job.
The Sea Dog mast step is (finally) in place.
Some big-old aluminum rivets seemed like a better idea than stainless screws. They make countersunk rivets using an I or a G drill bit (not a number, a letter.)
Rivets have better shear strength than screws, so this bad boy can hold up something like 1700 pounds.
So that’s the final “step” in the installation of new sails.
We’ll be bending them on some time in the next few weeks while we wait for paint to dry on the shelves for the V-berth water tank.
