

Travel 2020-2021
Winterizing
This is the last big job of the season. For the next few months it’s watching and waiting.
The checklist involves a number of jobs, some of which we already did by accident.

- Drain the water tanks. The forward tank has been empty (and dry) for years. The port tank leaked all the water, and the starboard tank was run dry a few weeks ago. So there’s that.
- Pump out the holding tank. Herrington Harbour did a nice job. The float sensor seems broken, so that needs to be replaced. (It still shows the tank as full.)
- Strike the sails. (Sadly, we didn’t get to try out the new main and mizzen. Next year.)
- Run anti-freeze through the raw water systems. This means the forward head and the engine. The forward head pump seems to be jammed, and needs to be rebuilt. The engine? Perfection.
We also brought the headsail sheets to the apartment for washing.

CA found some advice that we should (1) soak them in the tub for an hour, then (2) pull them into daisy chains, (3) bag them in a pillow-case, and (4) wash.
They’re heavy: 3 to 5 pounds each sheet.
We have a front-loading machine, so the pillow case to avoid tying up the central pillar of a top-loader is a non-issue.
I tried one sheet without a pre-soak, and we’re not happy. We’ll report on the washing to see what seems to work best.
The Lehman engine cold-start device is the best. Mr. Lehman sprang to life in the cold without a complaint. Ran flawlessly for a few minutes until the pink -50° antifreeze was gone from the bucket we use to inject it into the cooling system.
And that left the final step on the checklist.

Remove the key and tag it. No Raw Water. Engine cannot be run without resetting the sea chest valve.
Sigh.

Water Tank Replacement
The v-berth tank always leaked. The port side saloon tank now leaks.
The solution seems to involve custom tanks by Dura-Weld. See https://plasticfabricatedtanks.com.
Under the saloon floor we have two choices:
Option 1: Follow the Joie de Vivre plan and tear out the old tanks in their entirety. This gains about 4½″ vertically (by 35″ by 72″) which doesn’t seem like much until you consider the tank is only 12″ tall; this is 37.5% gain in volume.
Option 2: Sacrifice some volume and install four new tanks inside the legacy tanks. This involves less destruction and less reconstruction. It sacrifices volume, but lets us drop four tanks through the available hole in the cabin sole, strap them in, connect up tubes and have water.
Under the v-berth, we have similar choices. The tricky part about the v-berth is the tanks are not fiberglass with an aluminum lid. They’re 100% aluminum over some supporting structure. The aluminum could be sitting in a fiberglass shell, or could be sitting on wooden stringers.
I think I want to assemble 5 mini-tanks inside the available volume. Four are wedges, jammed into the fore and aft corners. The remaining one sits over the center ∨ at the aft (deep) end.

The access panel under the v-berth is 21″×21″. The space is 50″ long and expands from 12″ by the anchor locker to 54″ by the forward head.
I think a handful of tanks that are less than 21″×21″ can be dropped into the space and plumbed together with a common filler, common vents and common drains. This will create a system of tanks less than the original volume, but made of of nice, clean, new materials.
I think I can strap each tank to a plywood base and screw the base to the aluminum, minimizing the destruction.
What’s the original volume?
Yes, that’s calculus. 42¾ gallons. (The formula assumes the 54″×17″ triangle shape is consistent from front to back. I can’t measure the front triangle, but it appears congruent with a 12″ base.)
Five tanks of 4, 4, 6, 6, and 18 gallons gets to 38 gallons of water. It’s better than what we have now, which is an estimated 42¾ gallons of air.
Next Steps?
Cut the old aluminum lid off the old tank. I think this involves the following:
- Drill holes into the aluminum tank lid under the v-berth access hole. Use the reciprocating saw (the Dewalt version of a Sawzall) to cut away the tank lid. This will be larger than the original (tiny) access panel on top of the tank, and make some room to work.
- Slice all the rivets around the outside of the lid. I don’t know if I can reach all of them. This may involve some advanced yoga to get the saw all the way in there. The Dewalt has four blade position alternatives, and this may key to slicing off the rivets.
- Cut the lid into pieces and pull them out through the hole. This involves carefully checking clearance to be sure I don’t accidentally saw through something important, like the v-berth itself.
- See what access we have under the floor to the aft section of the tank. I theorize that there’s an awkward space that — perhaps — can be cut away to allow putting in really handy drains from the aft ends of the three tanks that fill the aft end of the void. A drain that’s at the lowest point (with no pickup) would be handy for priming the water pump.
Once we have access, we can start to make more concrete plans.
- Measure. Measure. Measure. The size of the forward cabin door and the size of the companionway hatch may constrain the tank sizes. (Scott and Jeanie got a 21″×16″ tank into the saloon, which suggests this may not be a constraint.)
- Redo all my concept sketches with correct measurements.
- Get some CAD software and draw the plans for all five tanks. Maybe https://www.shapr3d.com/3d-for/engineering will do what I need.
- Make cardboard mockups and dry-run the installation to see if this will work.
- Update the CAD drawings.
- Order tanks.
- Order plumbing parts CA wants to replace the filler and vent lines, too. Why not?
Then we can see if I can assemble it all.
I want to do the v-berth first because there’s nothing at stake there. It’s a complete win if this works out.
While the saloon is simpler geometrically, I think it involves a more complex path of destruction to get the old tank lids out.

The Sea Chest
The sea chest sounds so nautical and “yo-heave-ho,” but it isn’t. It’s also called a water box; it’s the manifold where sea water comes in for the various systems that use it. Once upon a time, we had air conditioners, a fridge, and two heads that flushed with sea water, plus, of course raw water for the engine. And. Bonus. A fancy deck wash down system that pulled sea chest water.
Now we have the engine, the forward head, and the wash down. CA likes things simple.
The system is below the water line and requires double hose clamps, with annual inspection and no tolerance for rust. CA has a socket driver with the hose-clamp socket on it. She likes to check things carefully. And independently from my casual, shrugging acceptance of rusty things.
CA didn’t like the vent line. It’s about 10′ of heavy-duty ⅝″ hose that snakes up to the tippy-top of the wet locker to allow air into (and out of) the sea chest. The hose clamps were rusty and the hose was sketchy-looking. It has been mashed out of shape around a too-small hose barb.

She shut off the water. Cleaned the strainer. And then took a utility knife down into the bilge to cut away the old hose.
And.
Broke the sketchy, rusty fitting.
Clean off.
That lead a big “Oh, crap, what did I do?” question.
The visions of doom arise when you break something like that.
Followed by my response.
“You broke that which could not be broken.”
After dodging the utility knife she was still holding, I had to thank her profusely for breaking something that was probably only a few years from catastrophic failure.
The picture may not reveal the essence of the problem. The original fitting was a reducer and a pipe nipple threaded into a ½” elbow. Not a hose barb.

Here it is in it’s shiny goodness. The picture’s awkward. But.
The bottom left is the top of the sea chest. A sheet of ¼” polycarbonate. Working from left to right, at the edge of the photo is a thick black hose that’s input.
Below it is a hard-to-see elbow that’s solid.
To the right, the blue circle, is the top of a valve that lets to the copper circle cap. This is where we put in antifreeze to winterize the raw water system.
Then the new copper fitting for the vent hose.
Down below the new fitting is an old, greenish elbow that’s rock solid. Maybe next year.
At the very bottom is a loop of hose that needs to be shortened. I’m a fan of leaving some slack, that hose is way too long.
The weather was almost nice enough to try out the new sails. The tide, however, was uncooperative.

We’re not sure we could get past he sea wall out into the Bay.

That Explains The Bilge Water
We have a bilge pump counter. Over the last few weeks we’ve been severely worried about the counter being non-zero.
Non-zero bilge pump counter is a sure sign of a leak.
When we return to the boat and the counter is more than one, it's a sign of a fairly serious problem. The counter is a score for seriousness on a scale of 1 to anything over 3. A worrisome problem. Leaks are notoriously hard to find in the complicated plastic structure of a boat.
The main hatches drip. The hawsepipe (where the anchor chain goes below deck) drips. This doesn’t explain the bilge pump.
We had the hatches rebedded to reduce the dripping. We’ve larded some goo around the base of the hawsepipe escutcheon.
The rain on Wednesday 11/11 was epic. 24 hours of non-stop rain. Non. Stop. The newly rebedded hatches leaked. We found the leak by complaining to the folks who rebedded them. They sent a guy over. He noted the gaskets were old.
At first he told us to replace them. After he left, CA checked the work order for the hatch work. They was supposed to redo the gaskets when they rebedded the hatches. About the time CA was ready to lecture them on the work-order, the company owner called (apparently, they also checked the work order) and the gaskets will be redone as soon as it dries out some more.
Here’s what we saw.

Above my finger is a big wad of goo that holds the lens in. We never took a knife and cut away the overflow. The goo is sitting on a mottled gray aluminum frame.
There’s a line of black behind my finger. That’s the gasket.
There’s a thin line of white. Daylight.
Then there's the light gray lower part of the aluminum frame. A line of new, white bedding compound and finally, the interior teak frame. The black at the bottom is the rest of the boat, cast into shadow by the flash.
About that thin line of daylight. I put the gasket in about 10 years ago. It’s now hard as a rock and no longer fills the space. We (seriously) did not think to check this when it started dripping. (Perhaps we didn’t need to rebed the hatches, and we only needed gaskets. Lesson learned on diagnosis.)
But these are drips. Not enough water to trigger the bilge pump. They’re minor annoyances. When the float switch is high enough to start the pump, it’s gallons of water down there.
Some History
We cleaned the port side water tank earlier this summer. Then we filled it.
Then we switched to the starboard tank. We’ve been using that water for the last month or so. CA washed the entire deck this weekend using water from the starboard tank. (Winter is coming, might as well drain the tank doing something useful.)
So.
After deck washing, as expected, the starboard tank finally ran dry.
When it did, we switched to port. Which is clean. And waiting for us.
But.
Here’s the kicker
The port tank is empty. EMPTY.
Ah.
That explains the bilge pump counter.
The port tank was sort-of-fine until we washed it. Now it’s not fine. It leaked the entire 100 gallons into the bilge.
There are a few choices open to us. All messy.
- Try to find and plug the leak. The tank is at least 72″ long, 29″ wide, and 11″ tall. Most of the edges are inaccessible. The forward 36" of the tank is all that’s visible. Access to the interior is worse: the inspection ports are too small to do much.
- Replace the port tank with a new state-of-the-art plastic tank.
Also. The V-berth tank has always leaked. We’ve never used it. It’s probably time to tackle it, also. We want a “bow-shaped” tank. I’ll need to take some measurements up there, too.
Scott and Jeanie on Joie de Vivre replaced both under-the-floor tanks with a combination of new tanks giving them more water than the original setup.
I’m thinking of something less clever. The port tank is close to 120 gallons. If I’m willing to give up 20-30% of it, I think I can (relatively easily) drop four custom-made 28-ish gallon tanks into the space under the floor.
(The space under the old tanks needs to be cleaned and painted; then supports and straps are required. It isn’t trivial. The original tanks were assembled with the hull, making them a right pain to replace.)
The cabin sole opening is 34″ × 23″. The space inside the tank is closer to 35″ wide and 72″ long. This is 4 tanks, each about 34″ × 17.5″. Individually, they fit through the opening. Collectively, they mostly fill the space. It leaves a 4” gap between the forward pair and the aft pair. (It’s all about 11″ deep if you want to check the cubic inch to gallon measurements.)
I think I can (easily) build a four-way filler manifold that lays across the tops of all four tanks. A four-way vent manifold, similarly, will be needed. The four-way pickup manifold at the bottoms of all four tanks would be a wonderful thing.
I think some of the manufacturers will add an inspection port. What’s important is figuring out where the opening under the settee will be and trying to get two aft-most tank inspection ports somewhere near this spot. The two forward tanks are easy, since they’re entirely visible.
Scott reports that there’s space outboard of the original tanks that’s accessible. I think he used used 9″ tall tanks to make best use of the space. But they have to be slid in carefully and supported over the curve of the bilge. Utterly inaccessible under the settee. Not simple to install.
Next steps?
Maybe put some water in the tank to observe the leak? Not sure this really helps. It’s essentially impossible to plug unless we’re super lucky.
Still one more test might be good. Maybe we had the valves set wrong and pumped all the water out of BOTH port and starboard tanks. There’s a tiny chance that (a) the starboard tank doesn’t leak, and (b) the bilge pump running was pure coincidence. (If so, there’s an epic leak somewhere else. A leak that didn’t trigger the bilge pump during the 24 hours of rain on the 11th. This seems unlikely.)
After Thanksgiving, I need to get the DeWalt reciprocating saw (to go with my other DeWalt tools) and start cutting. It’s messy and loud, but — it appears — it’s got to be done. Then I can measure carefully and determine what tanks (and fittings) to buy. Then I can try to build and epoxy in some support framing. (This can be tricky to bond to the interior of the hull when it’s cold.)
That will make for a fun winter project.

The Best Wife Ever
CA made me this today. The top picture is the new “wife” used to carry the SAE wrenches. The bottom is the old wife.
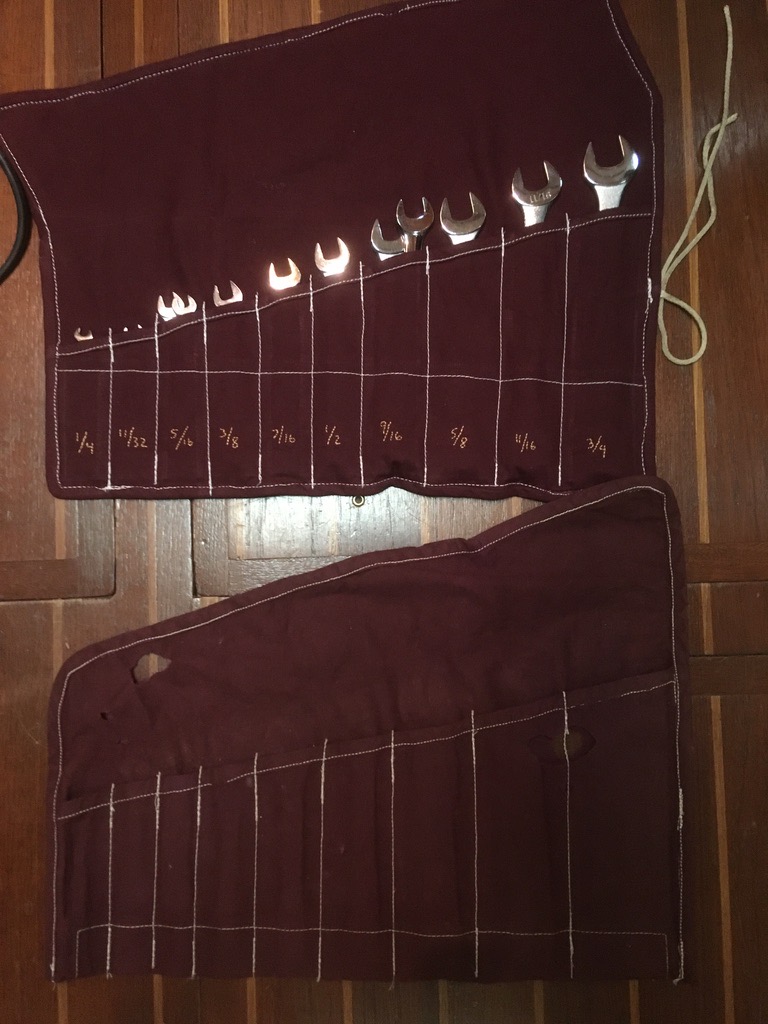
Notice the following:
- No Holes. (The bottom picture shows one hole on the flap. The other side was hilariously holy.)
- Labels for the pockets. Embroidered.
- The right number of pockets (to include the new 11/16 wrench.)
- The offset angle for the flap means it doesn’t stick out funny on one side, but rolls into a tidy cylinder.
And yes, I have some duplicate wrenches.
The metric wrenches didn’t need a new wife. No holes. Correct flap. Labels aren’t needed, since they’re simply 8mm to 16mm.
The. Best. Wife. Ever.

Interior Work: Galley and Portlights
CA bought a magnetic knife holder to put with her refinished cutting board.
Getting the backing plate away from the magnet is not fun. You have to commit to pulling them apart without wavering in the least. If you hesitate, that piece of steel will take chunks out of your finger-tips.

She started measuring and stopped to laugh for a while.
“I almost asked for the level,” she said. “Why would I use the carpenter’s level in here? We still have a ¾ tank of fuel. Nothing is level.”
A couple of pencil dots and some drilling after that and she’s got a place for the knives.
She made me put the big magnet bar onto the backing plate. It does jump out of your hands, that’s for sure.
Next up?
The Beckson port lights have rubber gaskets. We think the original gaskets might have dated from the 80’s. They leaked.
We tried to replace them and did a terrible job. We didn’t really read the instructions carefully enough.

This time, CA read the instructions to me several times to make sure I totally understood what was going to happen.
See https://www.beckson.com/installgasket.html for the details.
She called out two important points about this process.
First, Step 3, "Find a polycarbonate (rigid plastic) or hardwood headed mallet.” We did not do this before. It turns out, this is critical. Forcing it in with your fingers doesn’t work well. Eventually, you get them in, but, they’re not quite right and you have to crush them flat to get them not to leak.
Also, Step 8 has two parts, and they are out of order.
Step 8(a) should be “CLEAN AND DRY THE SCREEN OR BACKUP RING…” Do this after you finish the top two corners but before you try the bottom two corners.
Step 8(b) should be "So, continue around the window body…” Do this after you put the screen in.
We used a heat gun to warm them up before putting them in. That seems to work out well, also.
We think we may have done the first two correctly. Ten more to go.
Something in the entertainment system has stopped working. It appears that I no longer have power to the Fusion stereo. Circuit breaker appears OK; power is available at the panel. I have a little connection strip that’s almost — but not quite — inaccessible under the stereo. I need to pull that out and see if something’s come loose or corroded and leading to a faulty connection.

West River Sailing Club
This is a set of chores we take on with joy.

This is the WRSC dock.
A long, long string of wood and plumbing and electrical.
The idea is to rip out pieces each year.
Since becoming members, I’ve helped with a fair amount of dock building (except for last year, when we were in Nevada.)
It’s strenuous, but satisfying work. A couple of hammers, couple of very long pry bars, some pressure-treated wood, a pound of galvanized nails and some caulk to seal the tops of the stringers under the decking itself.
We use nails (not screws) because this all has to come out in ten years. Also. Some maintenance jobs (i.e. electrical work under the decking) requires pulling up planks once in a while.
Fitting the plans around the pilings means “bring a saw.” Something I’ll remember to do in the spring.
A few members (I think) have worked on every inch over their tenure. Maybe someday, I’ll be one of the folks that’s put a nail in every board.
