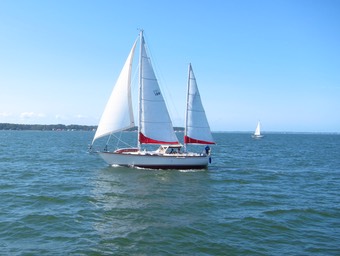

Travel 2017-2018
Through Hull Exercise
The Whitby design has a fairly large number of through-hull fittings. They let water in (and out) of the boat in a controlled fashion. For fittings below the waterline, we have huge bronze valves — sea cocks — to be sure we can close off the hole in case a hose fails.
We never expected oysters, though. They’re tricky little devils.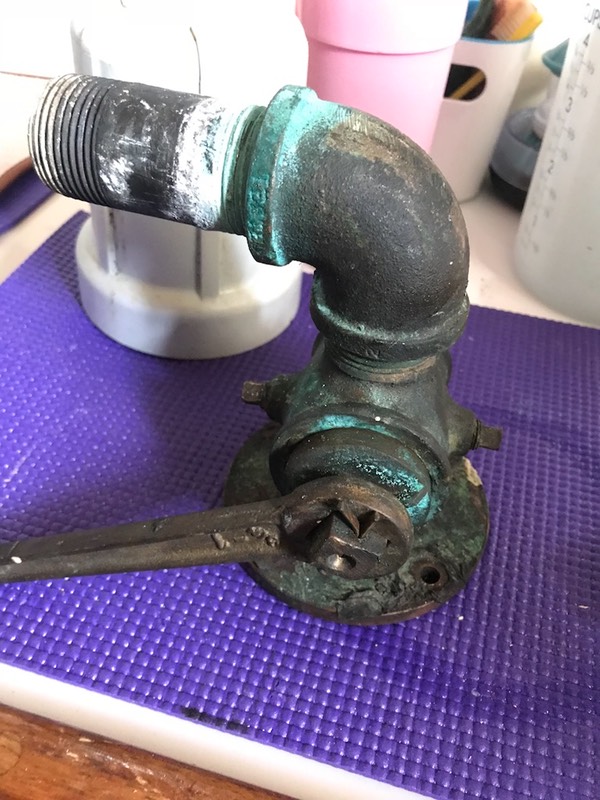
You can see the essential elements of the valve here:
A flange at the bottom that bolts through the hull. A run of pipe screws into that and reaches out into the outside world.
A giant lever to open and close the valve.
A piece of bronze pipe where we can put 1½” or 1⅝” hose. Yes, we have two sizes. Choose wisely.
In this picture it’s hard to see the two little plug” on each side. These give you some access to the internals.
The original design for a Whitby 42 had the following:
- Two sea cocks forward for the MSD (Marine Sanitation Device — the toilet) and sink.
- Three sea cocks amidships for the galley sink, a deck drain and the “water box” that has all of the incoming water. (Engine cooling, head flushing, refrigeration cooling, etc.)
- A small one amidships for the macerator pump output.
- Three sea cocks aft for the cockpit drains, the aft MSD, and the aft sink.
Nine, all told. Add two for air conditioner output, and we’re at 11 holes into the water. Each with a valve and a hose.
History
First things first. When we bought Red Ranger, the A/C output hoses did not have sea-cocks on them. I fixed this ASAP. A hose without a cutoff valve is an accident waiting to happen.
A few years later, we realized we didn’t use the A/C very often. At anchor, we rigged breeze catchers. At the dock, we found the fans were adequate. And the aft A/C in particular, only seemed to cool the bilge. We don’t want to carry it around. We took it out and sold it. This simplified the plumbing and pumping under the floor, also.
For a large boat like Red Ranger, it’s common to have “Y” valves for the MSD’s. Waste can go to a holding tank or it can go straight out to sea. In much of the US territorial waters, the holding tank must be used and the waste must be pumped ashore. Off shore, however, the “Y” valve can be switched and the head pumps overboard.
Because the previous owner planned on staying in Chesapeake Bay, the “Y” values were not installed. The through hull was put in, but it was capped off. The heads only flushed into the holding tank. This means the through hulls for the holding tanks are left perpetually closed.
We replaced the MSD (with it's water flush drippy pump) with a composting toilet.
If you’re keeping score, this eliminated two through-hulls: the aft MSD and the aft A/C. We had Deltaville Boatyard pull out the giant bronze fitting (and the little plastic fitting) and seal up the holes.
Later, we removed the forward A/C. We didn’t use it, either. Why carry it around?
Latest Updates
Recently, we had the Drain Hoses redone, eliminating another through-hull. We had Phipps and Osprey here at Herrington Harbour rebuild the drains. They pulled out another giant bronze fitting (and the little plastic fitting) and sealed up two more holes.

The deck drain on the starboard side was always slow. The drain on the port side leaked into the engine room.
Now we know why the starboard drain was slow.
That’s an oyster.
It’s living inside the valve. Once upon a time, the forward head sink didn’t drain well. We were in the Bahamas and I used a screw-driver to get rid of the oyster living there.
In Chesapeake Bay, I wasn’t too motivated to dive in the turbid waters to dodge jellyfish and inspect the openings.
Today, Red Ranger has seven holes through to the ocean.
Maintenance
These things are super robust and very reliable. You can see the core of the valve is a giant, machined cylinder of bronze. The body, similarly, is a casting with the inside machined to match this tapered core cylinder.
All it needs is a little marine grease to keep it moving.
Which leads to the annual through-hull exercise.
- Open the floors to inspect all seven devices.
- Check the hose clamps. (Double clamps below the waterline.)
- Apply grease by putting a ⅛” NPT Zerk fitting into the drain holes and pumping in grease. (Only when the valve is open. Greasing a valve that’s closed doesn’t do anything.)
- Operate the lever.
Step four can be really, really hard. Six of the seven through hulls are readily accessible. A pipe wrench can be used for leverage to move the bar. The main water intake valve is one we use fairly regularly, and it’s hard to move without some extra leverage.

One valve is almost inaccessible. It’s under the aft cabin ladder. You don’t reach down through the floor. You open the aft head, lay down, and reach over the top of the drive shaft to get at the handle.
In this picture, you can see the body — with the core removed. The bright line in the bottom of the picture is the drive shaft. The shadowy thing on the left is a prop-lock brake.
On the top of the picture is a tiny rectangle of light. This is where the old aid conditioner access used to be. The hole is barely large enough for a wrench. That’s a 1⅜” socket on the ½” drive wrench.

When we bought Red Ranger, I rebuilt all the through hulls that I could get to. At the time, there was an A/C unit on top of this, and I couldn’t get at it.
There was a fair amount of banging and clanging, but — as you can see — we eventually got the valve apart, cleaned it, greased it, and reassembled it.
All of the through hulls have been checked and greased and they all operate.
There are a few more things to do. We should be in the water soon. I hope. With new drains, and no oysters.

The Drain Hose
We’ve moved the deck drain hoses. The Whitby has wonderful bulwarks that trap water running over the decks. The original Whitby design had hoses that ran from deck drains to through-hulls below the waterline. It’s an elegant idea that keeps the cockpit dry and makes sure dropped tools don’t always fall overboard. It improves your footing to have a big, sturdy frame running around the deck.
However.
The two “saddle-bag” fuel tanks are in the way of this elegant idea.
On the starboard side the drain hose had two 90° turns around the fuel tank and to make it down to the through-hull.
On the port side… well… it’s complicated. The location of the through-hull would be a nearly inaccessible spot just aft of the sea-chest. It looks like the builders opted instead to run the drain hose around the lazarette and “T” it into a cockpit drain hose.

Here’s the new design, viewed from the inside.
The old port side had a long stretch of hose that can have standing water in it during winter’s freeze-and-thaw cycles. And this means the hose can work its way off the hose clamps through protracted stretch/shrink cycles.
Which means rain water running down into the engine room.

Which fills the bilge.
And. This.
“What am I looking at?” you ask.
That’s the floor of the engine room. At the left edge of the picture is a wheel on the engine. At the bottom of the picture is a bracket that used to hold a refrigeration pump. The rectangular opening is under the floor of the engine room, which is the top of the center file tank. The hoses are fuel lines.
The red?
The red is diesel fuel.
Yes. The bilge and the pan under the engine were filled with diesel. Filled.
How can that happen?
Here’s my theory. Water runs down into the bilge. Red Ranger is blocked with the bow slightly lower than the stern. Enough that water pools forward in the cockpit and forward under the engine.
Instead of running aft to the deep bilge, the water runs forward, pooling on top of the center fuel tank.
A long time ago, we’d had a mechanic look at the center tank. The top of the tank had holes in the aluminum. (They took of the inspection plate, stuck a camera down inside and took pictures to show pin-holes and stalactites of oxidized aluminum. The center tank had water in it. We know it leaks. We haven’t been using it. It requires a fairly sophisticated repair to create a proper dam around the lid. (Either remove the engine or cut away the keel to replace the tank.)
If the water was leaking into the tank, then, it will — eventually — fill the tank. Since water is denser than diesel, the remaining diesel from the bottom fo the tank floated up and into the bilge.
Yuck.
It’s all been pumped out, and poured into the bilge-water reclamation tank.
Now we need to find a way to clean the diesel residue. I think it means a little soap and a lot of water once we’re blocked so things drain aft and can be properly pumped out.

The Sea Chest
Red Ranger uses “raw” water for a number of things: flushing the forward head, rinsing in the galley sink, cooling the engine, washing down the anchor. Once upon a time, it also had air conditioners, a fridge, and an aft head that used raw water also.
All of the raw water comes through a single intake called a sea chest. It’s box with a hose that leads through a hole in the bottom of the boat and a bunch of hoses leading various places around Red Ranger.
When I removed the aft head, the water-cooled fridge, and the A/C, I capped the hoses. This means putting in a hose barb-to-threaded pipe adapter and a cap on the threaded part.
However.
That’s four separate hose clamps to inspect each year. And it’s just a hose full of raw water laying around in the bilge. Which leads to this:
“Why is this hose here?”
“Because it’s a right pain in the ass to shut off the water intake, disconnect it from the sea chest, and cap it properly.”

We’re out of the water right now, so closing the valve is academic. And the consequences of a mistake are negligible.
The gray rectangle is the top of the sea chest — it’s a piece of acrylic that lets us see the state of the water flow.

Here’s the bonus fitting we replaced. It’s a valve with an elbow, a fitting to change from ½” pipe to ¾” hose threads and a cap.
We can attach a hose to this and use dock water instead of raw water. It’s a way to flush the engine. More importantly, we can use this to put anti-freeze into the water box and fill the various systems for storage over the winter.
The previous version of this fitting had a valve handle that was rusting from exposure to salt water down there.
And you can see the clutter of hoses in the background of the picture. It’s a busy place.
Still to do?

Final work on the through-hull changes. Here’s what’s been done so far…
The original scupper drains ran down to a through-hull fitting below the water line. Very clean. Also. A very long run of difficult to maintain hose. With a 90° turn that never seemed to drain well in heavy rains. At the bottom was a through-hull fitting, all of which are potential problems.
Here’s the new design.
About a foot of hose and it drains through the upper part of the hull. This will develop a rusty weeping stain on the side of the boat.
But.
We can access it, repair it. and clean it out when it’s backed up with leaf litter.
We can even add a valve between the bronze part and the hose in the unlikely event of hose failure while we’re heeled over.
The port-side drains were much more complex. A hose went from the deck scupper to a T-fitting shared with the port cockpit drain (and the aft head sink.) Seriously. Three drains with various T’s and hose clamps.

Worse: the port side T-fitting broke and leaked into the engine room. We’re excited to have the port drains simplified.
Here’s the starboard drain. It’s a robust bronze fitting. It will develop a weeping stain that we will have to wash and wax.
Forward of the fitting you can see blue scuff marks from a fender we used to use until it started leaving vinyl on the hull. The port side is worse. We have a lot of cosmetic work to do.
You can see the reflection of the neighbor’s boat. So the wax I put on four or so years ago is holding up pretty well.
We also replaced the old through-hull fitting that was part of the air conditioning we removed. We’re waiting for the plastics guy to fill the two holes with solid FRP plugs, glass over, prepare, and paint the openings. All of that requires a stretch of warm weather.
Then we can look at the fuel pump drip. But that’s another weekend on Red Ranger.
