To see as much of the world as we can,
Using the smallest carbon footprint we can,
Spending the least amount of money we can,
Making as many friends we can.
To see as much of the world as we can,
Using the smallest carbon footprint we can,
Spending the least amount of money we can,
Making as many friends we can.


The Commodore Says: “I don’t want to depend on pump-outs, since they’re an America-only requirement; and I don’t like the head flushing directly into a bay or creek.”
Enter the Air Head and the Nature’s Head composting toilets. These are very similar products that separate solid from liquid waste. Liquids are simply poured overboard. Solid waste, however, is carefully dried with some peat moss (sphagnum) or coir (dried coconut husk). After drying, it’s compost, suitable for gardening.
We’ve had a painful fridge-ectomy, and a painful AC-ectomy, also. I guess we really like replacing large, complex equipment. In this case, removing the old head is—if you’re not careful—messy. Really, nasty messy. To prevent problems, some math will be required.
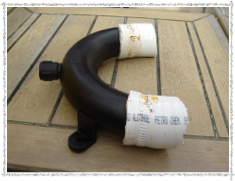
The Vented Loop
Heads that flush through to the ocean require some care to prevent the ocean from bubbling up through the head. One solution is to position the heads above the heeled waterline. Not practical on a small sailboat.
When heads are located below the water line, the drain hose must go up above the waterline, then down below the waterline and overboard. To prevent siphoning water in through this hose, there’s a small one-way air vent installed at the tippy-top. This “vented loop” technique is used for heads as well as the engine cooling water, which also exits near the waterline.
Red Ranger, by the way, had no “Y” values. She did have the exterior drain fittings, but they were capped. Both heads flushed only to the holding tank. She has a macerator pump that can pump the holding tank overboard, allowing a degree of self-sufficiency. I think I’ve got it working, but we don’t want to test it less than 3 miles offshore.
Disassembly
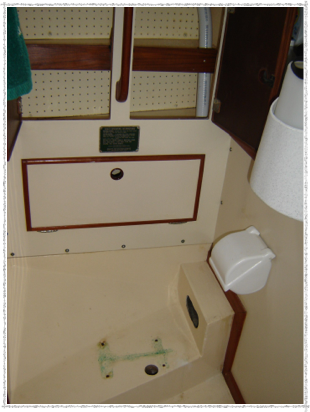
In order to put in a new head, we have to remove the old head. In addition to the big commode, there’s a water supply hose and a vented loop to remove, also.
Piece of cake, right?
Maybe it would have been simpler if I’d thought more about the vented loop. And how high it goes.

I make it just about 128 cu in. That’s only 0.074 cubic feet. Nothing, right?
Wrong. 128 cu in. is about two quarts. (1 cu. in. = 16 cc; 16 cc × 128 = 2,048 cc; about 2 liters.)
One half gallon of standing waste water.
Four pints, erupting like a little fountain of—do I need to go on? I could. It was a horror worthy of extensive, scatological detail.
Was anyone ready with a bucket?
No.
Clean Up In Aisle Seven
We ran the dock water hose straight into the head and started cleaning. A lot of buckets, rags, soap and vinegar were applied to the aft head. A lot.
It now smells pickle-fresh.
[And no, I did not have the urge to take a picture. At the time, it was a little too gag-inducing. Now, I realize I should have taken pictures just for the future yuck value.]
Just to be sure, I asked CA to wash the entire head again on Sunday. Why not? The bathroom can be washed down with a hose. It’s rather nice, really.
The old water supply and waste tank hoses were carefully capped and coiled away and cable-tied down for future removal.
Installation
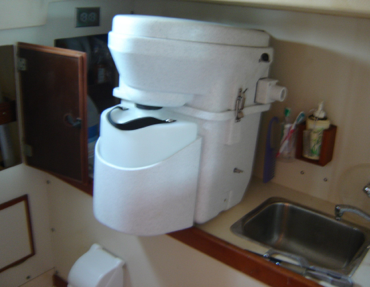
The empty Nature’s Head commode has been moved down from the counter-top and is now sitting in its approximate final location. We’ll try sitting on it a few more times before screwing it down permanently.
The head itself is held down with four screws. That part will be relatively easy.
A permanent air vent is required by a composting toilet. This will lead us to drill a 2” hole in the interior woodwork. Other Whitby’s have lead the hose to a spot on the aft edge of the cockpit coaming. A through-hull and a “through bulkhead” fitting are required to give us two clean, weather-proof exits for the vent hose.
We need a 1 ½″ device called a “double threaded bulkhead fitting”. The aquarium industry uses these to create a waterproof exit for threaded pipe. In this case, we’ll use two “male pipe thread (MPT) to hose inserts”. From there we need about six more inches of hose to a common marine through-hull. Waterproof matters a lot even for a spot under the cockpit coaming. Rain has a way of getting into everything.
An alternative is to drill a single hole through the hull above the heeled waterline and put a single through-hull down there. We’re not thrilled with the idea of holes in the hull, even way up high. The outside of the cockpit coaming seems to be a tiny bit safer.
Then we need power for the air vent fan. It’s a relatively low draw. And the head is close to the bilge pump power bus, which is directly fused to the batteries (and always on.) That should be fairly simple (I hope.)
Finally, we need to fill the holes left over from the old head and it’s plumbing. This mostly means putting some plywood onto the shelves to cover the 2” holes where the vented loop ran. Since we took four drawers apart, we happen to have a supply of lumber that’s appropriate to this kind of task. Also, it’s inside the shelf space (and not visible), so my dislike for finish carpentry won’t slow me down (much).
I think that a louvered ventilator should be used to cover the big oval opening down near the floor. More ventilation in the head seems like a good idea to me. West Marine carries almost two dozen varieties of ventilators. And it avoids attempting finish carpentry.
The final touch will be some MarineTex white to fill the four lag-bolt holes.
Commissioning
The final step is to “charge” the solid’s container with some moistened peat moss or coir.
We got a bag of sphagnum from Fawkes, so once installation is finished, we’ll be ready to go. [Hehe. Ready to Go. Get it?]
Monday, August 20, 2012
Painful Head-ectomy